Blog
Upload a custom design template
To upload your own CSS design template, email us at help@hederis.com.
Want us to translate an InDesign template into CSS? Email info@hederis.com to learn more about this option.
Create a custom design template
You can use the simple template designer to customize the look and feel of your Hederis:Comvert projects. On the Project Dashboard, go to “Step 3: Pick or Create a Template”, and click the Create Template button. You’ll be taken to the template builder, where you can configure a variety of design options, as follows:
General Page Setup
You can configure the default trim size for your new template, and choose whether or not chapters should always start on a recto (right-hand) page.
Page Margins
In this menu, you can set the default margins for your chapters, and also configure the running header and footer content. Running headers and footers can consist of text content, or use our built-in variables. To add text to your running headers or footers:
Click inside the text box, and type an opening quotation mark (“).
Now type the text that you want to appear, and then type a closing quotation mark (”).
Finally, press the Enter or Return key. Your text will appear as a gray bubble. To remove your typed text, simply press the X immediately to the right of the gray bubble.
Variables let you insert dynamic content that is pulled right from your book text, like the most recent chapter title, the book title, or the author name. You can also insert a variable to dynamically add the up-to-date page number. To include a variable, simply click on it and it will appear in the text box as a green bubble.

This example shows a running footer that uses our built-in Page Number variable, and a running header with text content.
You can also combine text and variables, by following the same steps above for each type of content you want to include.
Margin Text Formatting
You configured the content of your running headers and footers in the previous menu, but this is where you configure the actual appearance of all your running headers and footers. You can choose the font family, font size, and whether the text should be bold or italic.
Main Text Formatting
This is where you set some of the over-arching features of your book text. You can choose different fonts and text settings for your main text versus your headings, and set your general line-height and text-indent values.
To keep all your text lined up with the baseline grid, we let you add space above and below your headings in increments of your line height. For example, if your line height is 14pt, and you set Heading Lines Above to “2”, this will translate to a space above your headings of 28pt.
Titlepage Text Formatting
Titlepages and half-titlepages often need to be laid out differently than the rest of your text, so we give you extra options here. You can configure the font size, alignment, and more in this menu.
Frontmatter, Part, Backmatter
You can also customize the headings and chapter openers for your frontmatter sections, backmatter, and part pages.
Additionally, you can choose to use lower-roman numerals for your frontmatter page numbers.
Customize the design of an entire group of paragraphs, wrappers, or sections
You can also use processing instructions to customize the design of an entire style. For example, you can customize the design of every paragraph in your book that uses the “HED Box type” style. Similarly, you can customize the design of wrappers and sections in your book (for example, every letter in the book, or every appendix section). Follow the instructions in the previous section, but instead of using the STYLE processing instruction keyword, use GLOBAL STYLE, like this:

Using the SCOPE-BODY Option
You can also apply styles to your entire document, by using the SCOPE-BODY option in your GLOBAL STYLE processing instruction. This will expand the scope of your custom styles, so that they apply to the entire body of your manuscript, rather than being limited to just a group of elements. To do this:
Type your GLOBAL STYLE processing instruction, as described above.
At the very end of this processing instruction (but before any additional processing instructions that you’ll be adding via the “+” option, as described in “Add special layout instructions”), type: SCOPE-BODY.
Your styles will now be applied to the entire manuscript.

In this processing instruction, we’re overriding the running header text with our own custom text. You can read more about this code snippet in “Custom Styles Library”.
Customize the design of specific paragraphs, wrappers, or sections
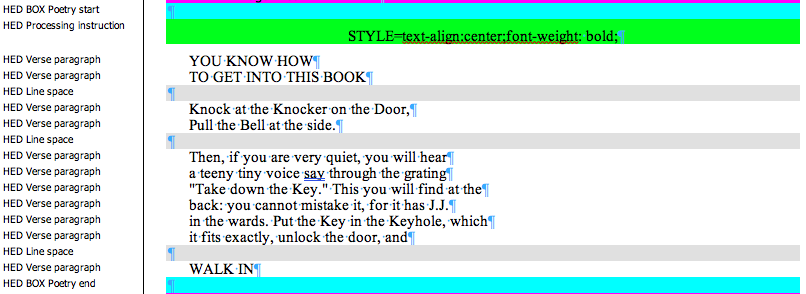
You can use processing instructions (see “Add special layout instructions”) to customize the design of individual paragraphs, wrappers, or sections in your manuscript. These design instructions are created with CSS, and will apply to both the PDF layout and the EPUB file. For the best results, make sure your CSS is valid, and add it without any extra line breaks or carriage returns (see the images below for examples). You can learn more about CSS here.
To customize a paragraph’s design:
Find the paragraph that you want to customize, and insert a new HED Processing instruction paragraph below it (for more details on how to do this, see “Add special layout instructions”).
In your processing instruction paragraph, type the text STYLE=, and then type the CSS that you want to apply to your paragraph.

If you want to customize a wrapper, insert the processing instruction paragraph after either the wrapper “start” or “end” paragraphs, as shown below:
To customize an entire section, insert the processing instruction paragraph after the section start paragraph, as shown here:

Note that your custom design will be applied to both the PDF and EPUB formats, as best as possible, so you may need to include fallbacks in case a certain CSS value is supported in one format but not the other. One example of this is color spaces: while you may want to use CMYK colors in your PDF output, the CMYK color space is generally not supported in the EPUB format. To get around this, include a fallback, like this:

Here, the layout engine will attempt to use the CMYK value first, and if it finds that it is not supported, it will fall back to the web value (which is supported on all web browsers and EPUB reading devices).
Add special layout instructions
You can tweak the design and layout of specific paragraphs, sections, or wrappers in your book by adding special instructions to your Word file, called processing instructions. We use processing instructions to convey a variety of different types of instructions: customizing running header content, adding CSS styles, adding attributes to the HTML, fixing image sizes, and more.
After you’ve converted your manuscript for the first time, you’ll receive a new Word file with all of the special Hederis styles applied. (See “Fine-tune Word Styles” for more information on working with Word styles.) We have an extra style just for adding these design and layout instructions: “HED Processing instruction”.
To add your processing instructions:
Find the paragraph that you want to customize the design of, and insert a new paragraph after it (place your cursor at the end of the paragraph, and then press enter).
In your new paragraph, type the code for the type of instruction you’re adding, and then type an equals sign, and then type the code for the special design instruction. See the end of this section for a list of all of these codes. For example, if you want a paragraph to be centered instead of left-aligned, your text would look like this:
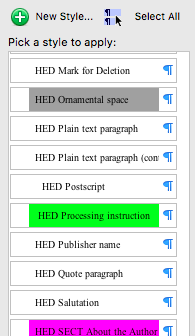
Finally, make sure your cursor is still in the new paragraph, and then open the Styles pane. Scroll to find the HED Processing instruction style name and click on it; this will apply it to your new paragraph.
You can apply a processing instruction to an entire section by inserting the processing instruction paragraph after the appropriate section start paragraph (see “Add a Section”), and to a box by inserting the processing instruction paragraph after either the wrapper start or end paragraph (see “Add a Wrapper”).
Processing Instruction codes:
Code | Possible values | Notes | Documentation |
IMAGE-SIZE | fullbleed | In the print file, this will create a fullbleed image that will fill an entire page and bleed area. See Images for more info. | |
STYLE | Any valid CSS property/value combination (see this reference) | See “Customize the design of specific paragraphs, wrappers, or sections” | |
FORMAT | ebook, print | Display a certain paragraph, wrapper, or section only in the ebook or PDF file. Default value is “both”. | |
GLOBAL STYLE | Any valid CSS property/value combination (see this reference). Also supports the “SCOPE-BODY” option. | To add custom design formatting to an entire group of elements (for example, to add a border around every extract in the entire book). | See “Customize the design of an entire group of paragraphs, wrappers, or sections” |
ATTRS | The name and value of one or more HTML attributes. Multiple attributes should be separated by a semi-colon. Also supports the “SCOPE-BODY” option. | You can use predefined HTML attributes, or make up your own attributes that start with the “data-” prefix. |
Have a suggestion for other types of instructions you might include? Email us! help@hederis.com
View baseline grid
If you’d like to see how your text aligns to the built-in baseline grid, to ensure that pages in your PDF are correctly balanced, you can turn it on by selecting “Show gridlines” in the “Configure Export Settings” option.
Add printer marks
Go to your Project Dashboard and expand the option labeled “Configure Export Settings”. Click the box marked “Trim Marks”. To turn off printer marks, uncheck this box.
Adjust PDF trim size and margins
Go to your Project Dashboard and expand the option labeled “Configure Export Settings”.
To adjust your PDF trim size, enter your chosen values in the height and width boxes, select a unit of measurement from the dropdown options. Your selection is auto-saved.
To adjust PDF margin widths, enter values for each of the margins that you’d like to adjust.
Adjusting the design of only certain paragraphs
Sometimes you only want to adjust the design of a specific paragraph, or a subset of paragraphs. For example, you may want to design Plain Text Paragraphs that appear inside of Note boxes differently than the Plain Text Paragraphs in your main text flow. Or, you may want to remove the text indent from every Plain Text Paragraph that follows a heading.
The great news is that you don’t need to create new styles for all of these types of variations; when you’re working with HTML, you can do this with the power of selectors! When you click on a paragraph in your paged preview, you’ll see another dropdown menu in your design tools sidebar, below the paragraph style name—these are your selector options. There are 5 types of selectors you can choose from:
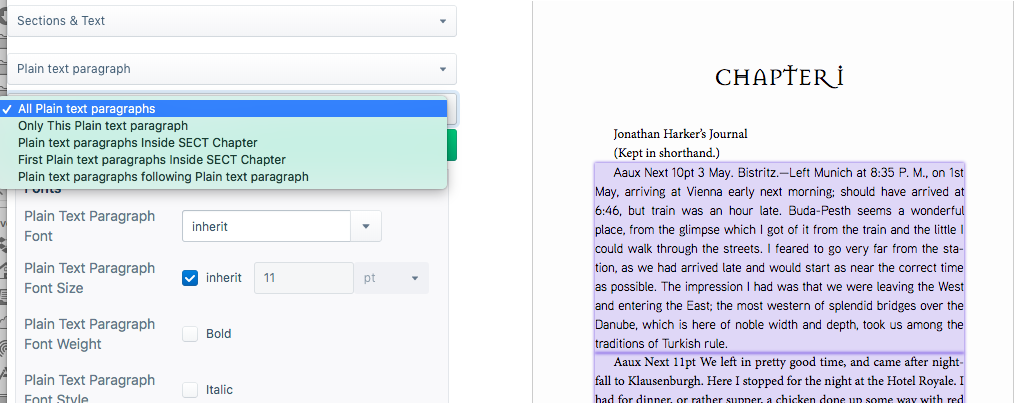
When you click on a paragraph in your paged preview, you’ll have 5 options in the Selectors dropdown menu.
All: The design you choose will apply to all paragraphs that use this style name. This is the default, and is what will happen if you choose a style name from the previous dropdown menu, rather than clicking on a paragraph.
Only this: Your design settings will only apply to the currently selected paragraph (i.e., the paragraph that you clicked on).
Inside: This option lets you limit the scope of your design to only apply to paragraphs that use this style and are inside the same kind of parent element that your currently selected paragraph is inside of. For example, if you were to click on a paragraph inside an extract, then this option would read “Plain text paragraphs inside BOX Extract.” This allows us to reuse the same style name inside different types of parents, but create different designs depending on the container—you can use this selector to make all plain text paragraphs inside an extract look different than the rest of the plain text paragraphs in the chapter.
First: Similarly, you can also limit your design to only the first instance of this style inside of a specific parent. For example, you could remove the indent from the first plain text paragraph inside your extract.
Following: Finally, you can create designs based on the order of elements in your book. For example, if you want to remove the indent from every plain text paragraph that follows a chapter title, you’d use this option (note that you have to actually find an instance in your book of a plain text paragraph following a chapter title, and then click on it, in order for this option to appear in your Selector menu). This is great for adding spacing around elements, without needing to create all new styles.
