Blog
Styles and the Edit Text Pane
While Hederis is not (currently) meant to be used as a full-featured text editor like Microsoft Word, there are many text-editing tasks that you’ll need to do during the book production process. Instead of having to go back to Word and upload a new Word manuscript every time you need to edit text or change a paragraph style, we created the Edit Text pane to give you a way to do focused work with the book text, without all the distractions of the Design pane. This is where you can edit paragraph text; add and delete new paragraphs, wrappers, and sections; move paragraphs around, and adjust which styles are applied to your paragraphs. Access the Edit Text pane by clicking the menu option in the top toolbar.
Text adjustments are covered in the following sections, but here’s how to adjust your styles in the Edit Text pane:
To change the style of a paragraph, find the paragraph in question, and click to select it.
In the top menu bar, open the “Change Type” dropdown menu.
Scroll to find the style you want to apply, and click to select it.
Paragraphs, Wrappers, Sections, and Inlines
INTENTIONALLY BLANK
There are four categories of styles that we use in Hederis: paragraphs, wrappers, sections, and inlines. Paragraphs are the types of content that you’re probably most familiar with: chapter titles, plain text paragraphs, quote paragraphs, list items, and so on all fall into this category.
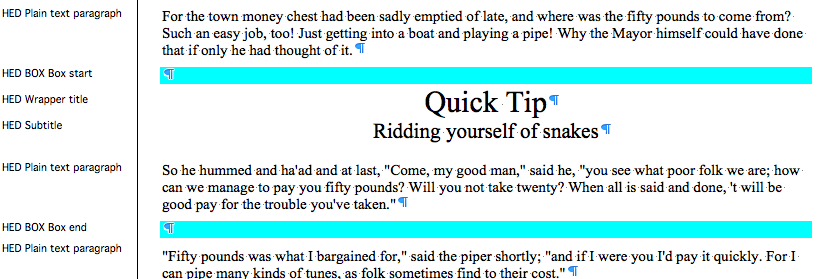
Wrappers are a way to group certain paragraphs together that should be distinguished from the main flow of text in some way. For example, if you have multiple paragraphs in an extract, those would be wrapped accordingly. Some other examples are poems, letters, epigraphs, and lists. See “Add a Wrapper” for more on this.
In your Word manuscript, wrappers look like this:
Many people are accustomed to using unique paragraph styles for everything, which results in very large style sets. For example, you’d need separate styles for body text vs. a text paragraph inside an extract, or for an extract title vs. a sidebar title. By using wrappers, we make it much easier to manage the number of paragraph styles you need to use. You can use the HED Plain text paragraph style for both your main body text and for the text inside your extracts, and because your extracts are enclosed in a wrapper, you’ll still be able to design those paragraphs differently if you want to. (See “Sections & Text” for more on how this works.)
Sections are the main chunks of your manuscript—you probably use words like chapters, parts, appendixes, prefaces, etc., to describe the sections in your book. At Hederis, we have special styles to mark your section breaks (see “Add a Section” to learn more). These section break styles tell our app where and how to split up your manuscript, and these breaks are used to create book features like your ebook table of contents (you can have more granular control over that if you want to – check out “Automatically Generate a Table of Contents” for more). In Word, section breaks look like this:

Inlines are the individual letters, words, and other symbols that make up your text. When you want to add a special meaning or style to a span of letters or words within a paragraph, you’d use an Inline style, like HED SPAN Bold, HED SPAN Small Caps, or HED SPAN Key phrase. See the appendix for a full list of our Inline styles.
About Styles
“Styles” are a way to add semantic tagging to your manuscript. Semantic tagging is an extra layer of metadata about your book text. It consists of information about what kind of element each piece of text is: chapter title, body text, extract, and so on. This information is crucial both for knowing how to apply design elements to your text (e.g., adding a border around all extracts, making chapter titles larger, etc.), and for knowing how to parse your book text into the various output formats you need. For example, EPUB files are required to create a table of contents that points to all the chapters in your book, and correctly identifying all the chapter titles in your manuscript helps us to know what text to include in that table of contents. See the next section, “Paragraphs, Wrappers, Sections, and Inlines,” for details about the types of styles we use in Hederis.
When you upload a file to Hederis, we automatically make some guesses about the different parts of your manuscript, but you are the person who knows your content best. It’s a good idea to review our guesses, and adjust them as needed so that your manuscript is correctly tagged. See “Working With Microsoft Word” for details on how this works.
Upload a Manuscript
To upload a Word manuscript to Hederis, open the “Upload DOCX” menu item from your Project Dashboard, and click the “Upload a Docx” button or drag a .docx file from your computer file system onto the browser window.
You can choose to have Hederis delete empty paragraphs when it processes your file - check the “Strip empty paragraphs” box to select this option.
Manuscripts and Book Text
Topics in this section:
- Manuscripts and Book Text
- Upload a Manuscript
- About Styles
- Paragraphs, Wrappers, Sections, and Inlines
- Styles and the Edit Text Pane
- Working with Microsoft Word
- Add a Paragraph
- Add a Wrapper
- Add a Section
- Add an Inline
- Automatically Generate a Table of Contents
- Set up a Table of Contents Manually
- Include content only in the PDF or EPUB
Create a Named Backup
It’s often useful to save a backup of the current state of all your files in Hederis. For example, you’ve reached the end of your print production workflow, and now need to make edits to the text to prepare it for your ebook. You can creat a “snapshot,” or named backup, of your final print files, so that you can restore to it later (for example, when it’s time to create the trade paperback edition of your book). A snapshot will save the book text, the current PDF, EPUB, Kindle EPUB, and Word file, as well as the current data about your book (for example, which sections are currently locked).
To create a snapshot:
Go to your project Dashboard, and click “Create a Snapshot.”
In the dialog box that opens, choose a name for your snapshot (one that is different from any snapshots you’ve already created for this particular project).
Then click “Create Snapshot.”
Your snapshot has now been created! To double check, go to the Settings & Invites pane for your project. You should see a section called “Restore from Snapshot,” and inside that section, a dropdown list of all the snapshots for your book. This is also where you’ll go to restore your files to any of your existing snapshots. Restoring to a snapshot is not reversible, so we generally recommend creating a new snapshot before restoring, just in case you decide you’ve made a mistake.
A Real Sample Workflow
Here’s a sample workflow that a publisher might follow, using Hederis. In this scenario, we’ll begin when the manuscript isn’t quite done, but it’s time to start the design process and/or prepare a galley file. Steps that should occur in Hederis are marked with the Hederis logo, as well as which mode in the app you should be using at that point.

Upload the manuscript to Hederis
Review the paragraph styles/coding and adjust as needed (in the Hederis text editor, or in Microsoft Word).
If working in Word, reupload the updated manuscript to Hederis.
Upload the book cover (to be used in the EPUB file), and any images that are used in your book (including logo images on the title page).
Outside of Hederis, finish working on your manuscript (editing, copyediting, etc.).
Start creating the design in the Design tab (you can also import a design template from another book and use it as-is, or add customizations on top of it).
Build the PDF and EPUB files to use for your galley or ARC.
Reupload final manuscript when it is ready.
Upload the final book cover, and any retouched images that need to be updated.
In the Design tab, finalize the design (taking into account any new styles that weren’t being used during the draft phase).
In the Page Layout tab, lock your pages so that the proofreader can mark-up line breaks and page breaks (see “Lock chapters to prevent reflow” for more information about this).
Rebuild and send out the PDF for proofread/first pass.
Enter edits in the Design tab. For advanced text editing, make your changes in the text editor. (But beware of lock syncing! See “Lock chapters to prevent reflow” for more information about this.)
Make page layout adjustments in the Page Layout tab (tightening and loosening letter spacing, forcing page breaks, etc.).
Rebuild the PDF and repeat entering edits/rebuilding for more review passes as needed.
Set your PDF export settings to comply with your printer’s requirements (bleed sizes, trim marks, grayscaling, etc.).
Rebuild the final files (PDF, EPUB, Kindle EPUB, HTML).
Send the PDF to your printer.
Extract sample content from the Hederis HTML, to post on your website, blogs, etc.
Validate your EPUB files (the standard EPUBCheck validation tool is built into the Hederis dashboard).
Convert the Kindle EPUB to kf8 (using Kindle Previewer or a similar tool).
Distribute using your normal distribution method.

Overview
Hederis:Convert is based on the concept of “single-source publishing”. The fundamental principle of this type of publishing workflow is that your final book files (EPUB, print PDF, HTML, etc.) are all controlled by a single file where you make all changes and edits; you then transform that file into all the output formats that you need, and all of those output files are 100% up-to-date.
In the Hederis:Convert workflow, this single source of truth is your Microsoft Word manuscript. This manuscript contains your up-to-date book text, as well as any instructions for the creation of your final output files. These instructions are given in the form of Word Styles, including the semantic tagging of your manuscript text. See “Semantic Tagging” for more on this.
A simple workflow example
Book production is a skilled craft, and requires fine-tuning from experts who understand the book’s text. Hederis:Convert reduces the time it takes to get laid out files into your review process, so that you can focus on creating a perfect single-source of truth (your Word manuscript). Don’t expect the results to be perfect after the first conversion - Hederis:Convert is a tool to help you in the book production process, and not a replacement for human experts.
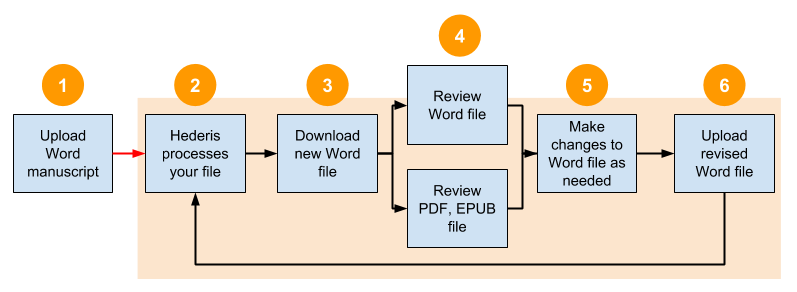
A sample workflow might look like the diagram above:
You upload your raw Word manuscript.
In the background, Hederis:Convert processes this manuscript, applies the necessary tagging, and creates initial PDF, EPUB, HTML files, along with a new Word manuscript that contains the results of this analysis.
You download this new Word file, which becomes your new working manuscript. (If you don’t use this new Word file as your working file, then you’ll have to redo a lot of work throughout this process.)
Your team reviews the new Word file, checking to make sure all paragraphs use the correct styles (see “Fine-tine Word Styles”), boxes are correctly wrapped (see “Add a Wrapper”), and chapter breaks are in the right places (see “Add a Section”).
You also review the PDF and EPUB file to see if anything needs to be tweaked in the Word file to create a cleaner output (see “Design” for more on this).
Make all required changes to your source Word file (which will be the most recent file created by Hederis).
Re-upload your latest-and-greatest Word file for conversion, and start a new review process to make sure your changes were correctly incorporated and to see if any new changes need to be made.
Guided Demo
Welcome to the Hederis design demo! This guide will get you up-and-running with our professional book design tools. (Don’t want to dive in? Check out the video here!)
We put together some sample files to help you get started—you can download them here. Imagine you’re a designer, and you’re receiving clean, coded files from your production editorial team. (For non-publishing folks, “clean and coded” means that the text has been copyedited, cleaned up, and all the paragraphs have been labeled as titles, plain text, quotes, and so on.)*
*Our app actually helps with the labeling process too, via machine learning. You can watch a demo of that here.
Go to app.hederis.com and create an account.
If you use a Google account, creating a Hederis account is as simple as signing in with Google, but you also have the option of filling out a sign-up form using any email address, and choosing your own password. Since Typeset is still in beta, we don’t ask for a credit card and there are no extra steps required to sign up aside from confirming your email address.
Create a new Typeset project.
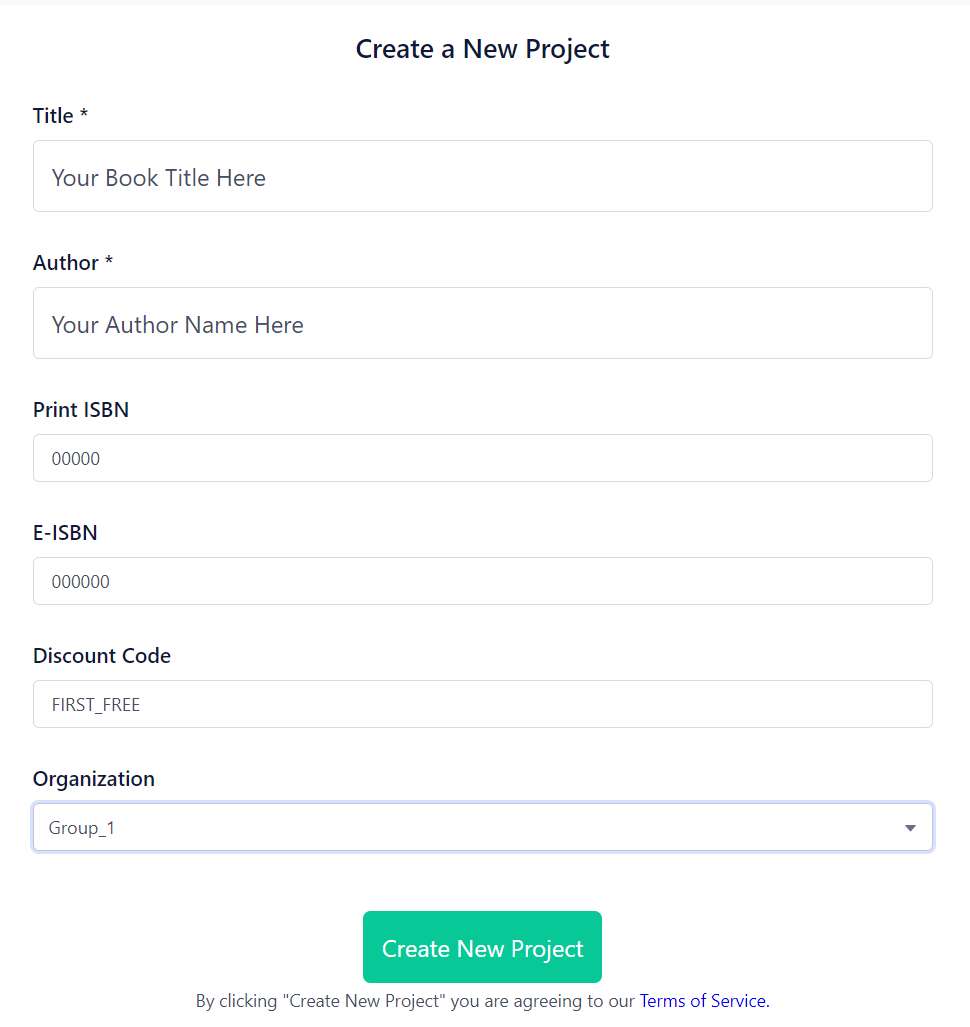
After you sign in, the first thing you should see is your list of projects, which is probably empty. Press the “Create a New Typeset Project” button at the bottom of the screen to create a new project. (You can also create a new Convert project, which is our pure automation product—you can read about it here.)

A form will pop up, prompting you to enter a title, author name, and ISBNs. Type anything you like here! If you don’t have an ISBN, you can just type “000000” in those fields.
Click “Create New Project,” and wait to be taken to your new Project Dashboard.
Upload the cover.
After you create your new project, you’ll immediately be taken to your Project Dashboard, where you can manage your book assets (like cover images and Word documents) and set some basic export options that might change frequently.*
*If you get an error saying you don’t have access to your project, try hitting the refresh button on your browser and then try again. #betaproblems :D
Let’s upload a cover now. On the dashboard, click to open up “Step 1: Upload a Cover.”
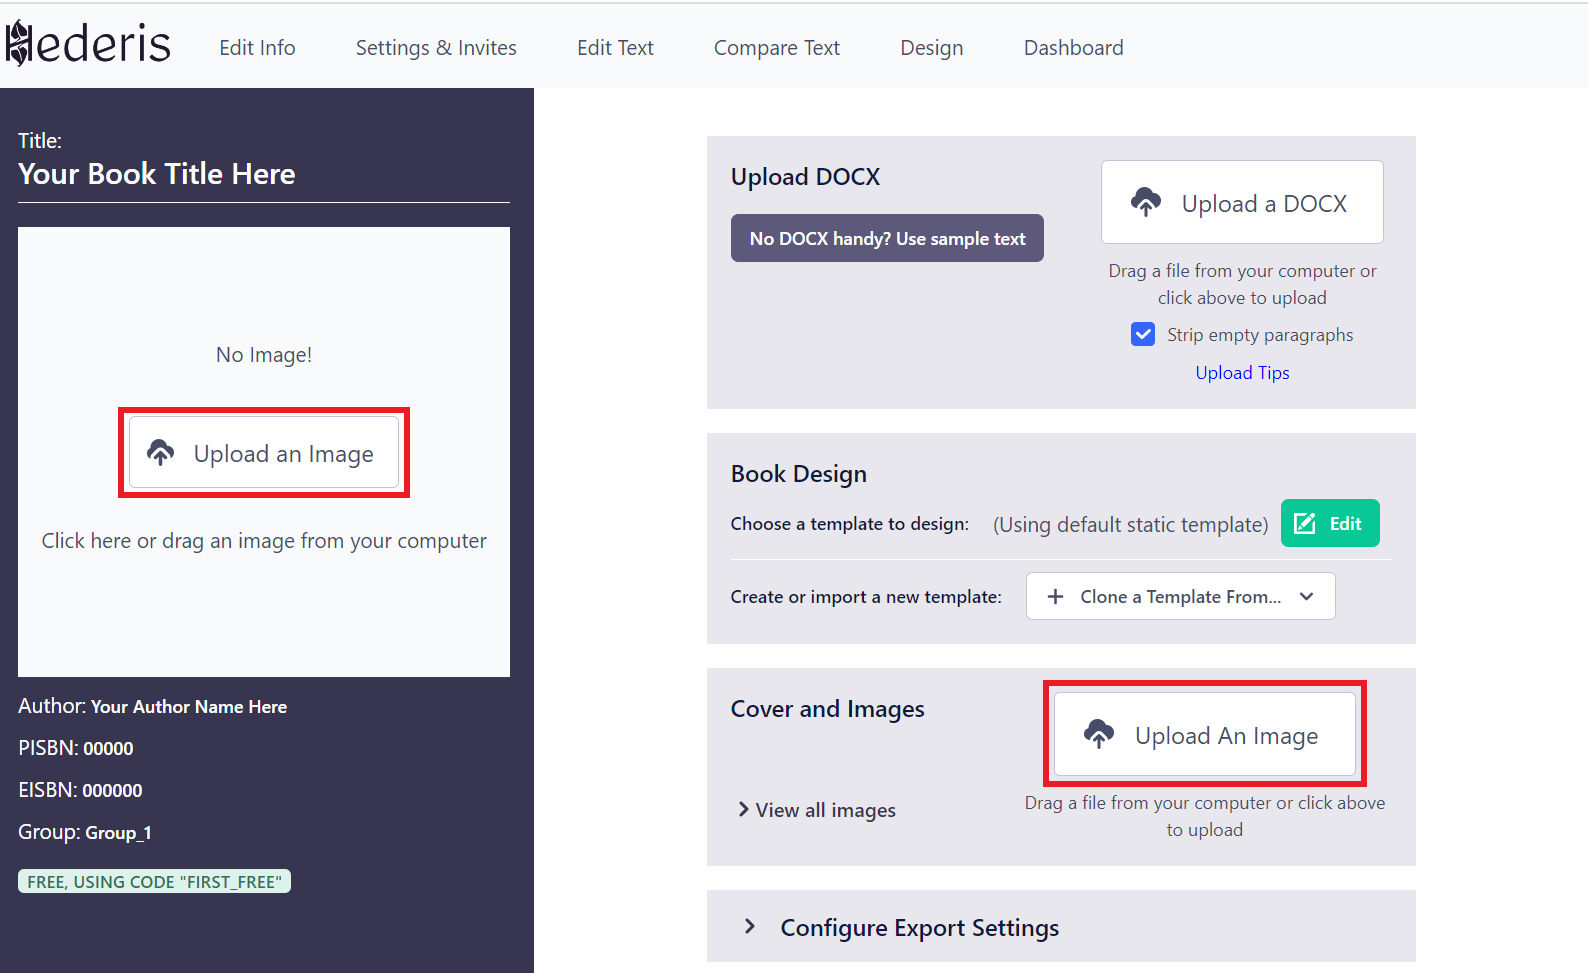
Now, in your downloaded folder of sample files, find the file called “COVER.png,” and drag it onto the browser window. The window should turn gray and the text “Drop File Anywhere” should appear. Go ahead and drop it! You should see your cover show up in the big box at the top left. Now close the “Step 1” menu, and we’ll move on.
Upload the book text.
Uploading book text works pretty similarly to uploading a cover. Open up “Step 3: Upload DOCX,” drag your Word document onto the browser window, and when the window turns gray, release your mouse to drop the file.
Hederis kicks into action, analyzing your book text, doing its best to figure out where the chapter breaks are, where the chapter titles are, and so on, and then converting it to HTML.
When it’s done converting, you’ll see a little message pop up at the top of your screen that says “Conversion Complete!”. Now we can start designing!
Design your book.
Click either the “Step 4” option, or click “Design” in the top right toolbar to open the design tools, and follow the directions in your book text. (If you’re not using our sample text, then check out the documentation here.)
See you later!
Welcome back! Now let’s make a PDF.
Great work on your book design! Now let’s turn it into a PDF that you can send to a printer (or just admire).
Return to your dashboard if you haven’t already (there’s a button in the top right toolbar). Find the green “Rebuild” button beneath your cover, and press it.
Wait a few moments until you get a message that says “Build Complete!”
Then in your list of downloadable files, click to download the PDF. When you open your downloaded file and scroll pages, you can see that the headings and text have all the design settings that you chose, and your running headers and footers are filled with the text and variables you set.
That’s it! Next steps would be to adjust your page breaks (sometimes called “paging” in publishing lingo) to fix any widows or orphans or weird hyphenations that you might have spotted—you can do that in the “Page Layout” menu on the Design tab—read more about that in “Adjusting letter spacing, line breaks, and page breaks (PDF-only)”.
